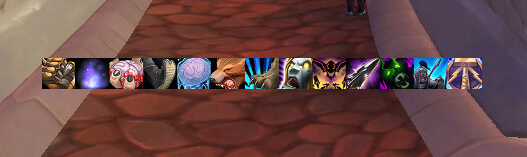
Marksmanship Hunter is a ranged PvP specialization built around frequent burst windows, strong crowd control and constant positional pressure. Chimera Shot, Aimed Shot and Kill Shot provide reliable offensive pressure, while Scatter Shot, Freezing Trap, Silencing Shot, Disengage and Readiness give the Hunter tools to create kill opportunities and survive enemy cooldowns.
1. Talents
Hunter Talents (WotLK)Beast Mastery0 points
Marksmanship53 points
Survival18 points
2. Glyphs
Major Glyphs
Minor Glyphs
3. Stats
Hit: 85(2.59%) from gear and 3% from Focused Aim (8%)
Arp: As much as you can via gear
Crit: ~60%
Resilience: minimum 900
Spell Penetration: 75(can vary by server)
4. Enchants
- Head: Arcanum of Triumph
- Shoulders: Inscription of Triumph
- Back: Flexweave Underlay / Enchant Cloak - Greater Speed
- Chest: Enchant Chest - Exceptional Resilience / Enchant Chest - Powerful Stats
- Wrists: Enchant Bracers - Greater Assault
- Hands: Hand-Mounted Pyro Rocket / Hyperspeed Accelerators
- Waist: Eternal Belt Buckle
- Legs: Earthen Leg Armor
- Feet: Nitro Boosts
- Main hand: Titanium Weapon Chain
- Ranged: Heartseeker Scope
5. Gems
Meta gem: Relentless Earthsiege Diamond
Red gems: Delicate Cardinal Ruby
Yellow gems: Delicate Cardinal Ruby / Mystic King's Amber / Lucent Ametrine
Blue gems: Stormy Majestic Zircon
6. BIS
Marksmanship PVP
7. Macros
Marksmanship hunter pvp macros
8. Food and flasks
Food: Fish Feast / Blackened Dragonfin
Pet food: Spiced Mammoth Treats
Flask: Flask of Endless Rage
Potion: Free Action Potion
9. Professions
Priority list:
10. Pet
Crab:
Pet Talents (WotLK)Ferocity0 points
Tenacity16 points
Cunning0 points
Spider:
Pet Talents (WotLK)Ferocity0 points
Tenacity0 points
Cunning16 points
Stats and gearing
The standard Hit requirement against an equal-level player is 5%.
With 3/3 Focused Aim providing 3% Hit, approximately 85 Hit Rating from gear gives another 2%, bringing the total above the normal 5% PvP requirement.
Additional Hit can still be useful against opponents with talents or effects that reduce their chance to be hit, but it should not come at the cost of major offensive or defensive stats.
Resilience is essential for surviving arena burst. Around 900 Resilience is a practical minimum for a hybrid damage-oriented setup, while more defensive gear can be used when facing compositions that consistently target the Hunter.
Spell Penetration helps prevent important magical abilities from being partially resisted. Around 75 Spell Penetration is a practical baseline, although the exact amount can vary depending on server mechanics and the resistances commonly encountered.
Armor Penetration is extremely strong for Marksmanship because a large portion of the burst comes from physical ranged attacks. Take as much Armor Penetration as practical through high-quality gear without sacrificing the necessary PvP stats.
Around 60% Critical Strike represents a strong high-end offensive value.
Agility remains an excellent general stat because it increases Attack Power, Critical Strike chance and Armor.
Hunter's Mark
Keep Hunter's Mark on the primary target whenever possible.
Marked for Death increases damage against marked targets and also improves the critical damage of several important shots.
Reapply Hunter's Mark after target switches when the new target is likely to remain your kill target long enough to justify the global cooldown.
Against Rogues and other stealth classes, Hunter's Mark can also make it harder for them to reset once they have been exposed.
Serpent Sting
Serpent Sting is the standard offensive sting when the objective is maximum direct pressure.
Chimera Shot refreshes Serpent Sting and immediately deals additional damage based on the sting.
This allows Serpent Sting to remain active without repeatedly spending globals refreshing it.
Apply Serpent Sting before a serious burst sequence so Chimera Shot receives the additional effect.
Avoid replacing an important Viper Sting with Serpent Sting automatically when Mana pressure is the more important win condition.
Viper Sting
Viper Sting is one of the strongest tools Marksmanship has against healers and Mana-dependent casters.
It drains Mana over time, and Chimera Shot refreshes the sting while also returning Mana to the Hunter based on the amount Viper Sting can drain.
This allows Marksmanship to create sustained Mana pressure without sacrificing Chimera Shot damage.
Use Viper Sting when the match is likely to be decided by healer Mana rather than immediate burst.
Protect the sting by forcing the enemy healer to spend time on healing, positioning or crowd control instead of freely dispelling it.
Against teams that are difficult to kill quickly, repeated Viper Sting and Chimera Shot pressure can become the main route to victory.
Scorpid Sting
Scorpid Sting gives Chimera Shot a utility option against physical attackers.
When Chimera Shot interacts with Scorpid Sting, it attempts to disarm the target.
The disarm effect has its own internal cooldown, so Scorpid Sting should be used deliberately rather than replacing offensive stings without a reason.
It can be useful against Warriors, Rogues, Death Knights and other weapon-dependent opponents during important offensive windows.
Chimera Shot
Chimera Shot is the core Marksmanship ability.
It deals strong weapon damage, refreshes the active sting and produces a different secondary effect depending on which sting is active.
With Serpent Sting, Chimera Shot adds immediate damage.
With Viper Sting, it contributes to Mana control.
With Scorpid Sting, it provides a disarm effect.
Use Chimera Shot as soon as possible during a real kill window, but choose the correct sting before the shot based on what the matchup requires.
Because Chimera Shot is instant, it remains reliable while moving and is one of the main sources of pressure while kiting.
Aimed Shot
Aimed Shot is a key PvP ability because it combines strong instant damage with a 50% healing reduction effect.
Keep the healing reduction active on the current kill target whenever significant healing is expected.
Glyph of Aimed Shot reduces its cooldown by two seconds, making it easier to maintain pressure and reapply the healing reduction after dispels or target changes.
Aimed Shot should be part of most burst sequences.
Do not waste it on a secondary target immediately before switching to the actual kill target unless the extra pressure has a clear purpose.
Arcane Shot
Arcane Shot provides instant magical damage and is useful while moving.
It is especially valuable against targets where Armor Penetration provides less benefit or when other primary shots are unavailable.
Because it shares no cast time requirement, Arcane Shot helps maintain pressure while creating distance from melee opponents.
Do not delay Chimera Shot or Aimed Shot simply to use Arcane Shot.
Steady Shot
Steady Shot is a filler when the Hunter can safely stand still and higher-priority instant shots are unavailable.
PvP rarely allows continuous uninterrupted Steady Shot casting.
Use it when positioning is secure, the target is controlled or the enemy team cannot immediately punish the cast.
Do not sacrifice positioning just to complete a Steady Shot.
Maintaining range, landing crowd control or avoiding enemy burst is usually more important than one filler cast.
Kill Shot
Kill Shot becomes available when the enemy reaches low health and provides extremely strong execute pressure.
Glyph of Kill Shot reduces its cooldown by six seconds, allowing another Kill Shot much sooner if the target survives the first attempt.
Use Kill Shot immediately when a real kill opportunity exists.
Coordinate it with Chimera Shot, Aimed Shot and partner damage so the enemy healer has minimal time to recover the target.
Be ready for defensive cooldowns as soon as the enemy enters execute range.
Burst windows
Marksmanship burst is based on combining several instant shots in a short period.
A typical offensive sequence can include:
Hunter's Mark → appropriate Sting → Aimed Shot → Chimera Shot → Arcane Shot → Kill Shot when available.
The exact order changes according to the target, crowd control and current cooldowns.
Silencing Shot can be used during the burst to stop a healer from responding.
Rapid Fire can increase sustained pressure when you have enough space to use Auto Shot and Steady Shot effectively.
The most important part of a burst is timing it with crowd control.
High damage into a healer who is completely free to cast is far less threatening than the same damage while that healer is trapped or silenced.
Silencing Shot
Silencing Shot is one of Marksmanship's most valuable control abilities.
It can interrupt a cast and silence the target, making it especially dangerous against healers.
Use it during a kill window to prevent a critical heal or defensive spell.
It can also stop important crowd control aimed at you or your partner.
Focus macros are extremely useful because they allow you to keep attacking the kill target while silencing another opponent.
Avoid using Silencing Shot randomly when the enemy healer has no important cast or when a coordinated burst is about to begin.
Scatter Shot
Scatter Shot is a short-range crowd control tool that is central to Hunter setup.
One of its most important uses is creating a reliable Freezing Trap opportunity.
A common sequence is:
Scatter Shot → move into trap position → Freezing Trap.
Scatter Shot can also be used defensively to stop an enemy DPS during their burst or to create enough time to reposition.
Avoid immediately breaking Scatter Shot with unnecessary damage.
When using it to set up a trap, control your Auto Shot and pet so they do not interfere with the setup.
Freezing Trap and Freezing Arrow
Freezing Trap removes an enemy from the fight and is one of the main ways Marksmanship creates kill windows.
Use Scatter Shot, pet control or teammate crowd control to make the trap reliable.
Freezing Arrow allows a Freezing Trap effect to be placed at range.
This is useful when moving into normal trap range would be dangerous or when a healer is positioned too far away.
Track enemy PvP trinkets carefully.
A trap that forces the trinket can create an even stronger crowd control opportunity later in the match.
Frost Trap
Frost Trap provides area control rather than a full incapacitate.
Use it to slow melee opponents, control narrow paths or make it difficult for enemies to reconnect after Disengage.
It is particularly useful when several enemies are pushing toward you or your healer.
Place it where opponents must cross the slowing area instead of simply dropping it at your current position without considering where the fight is moving.
Concussive Shot
Concussive Shot is a simple but important kiting tool.
Keep the slow active when a melee opponent is trying to reach you or when a target is attempting to escape your team's pressure.
The ability costs only a global cooldown and can create enough distance for additional ranged attacks.
Combine it with Disengage, Frost Trap and pet control to maintain separation.
Disengage
Disengage is one of the most important Hunter mobility abilities.
Use it to create distance from melee opponents, escape dangerous positions or quickly move toward a better line of sight.
Glyph of Disengage reduces the cooldown by five seconds, giving much more frequent access to the ability.
Position your character before using Disengage because the direction of the jump depends on your facing.
Good Disengage usage should place you somewhere useful rather than simply moving you a few yards away.
It can also be used aggressively to move toward a target or reach a position for crowd control when the situation is safe.
Master's Call
Master's Call removes roots and movement-impairing effects and temporarily protects the target from new ones.
Use it to escape slows and roots when kiting.
It can also be cast on a teammate, making it extremely valuable for helping a healer escape melee pressure or allowing a partner to reconnect with a target.
The pet must be able to reach the chosen target, so pet positioning matters.
Do not allow the pet to become trapped behind pillars or crowd controlled when Master's Call may soon be required.
Deterrence
Deterrence is the primary major defensive cooldown.
It provides powerful protection against incoming melee, ranged and spell attacks for five seconds.
Use it against major enemy offensive cooldowns or when your healer cannot keep you alive.
Do not wait until you are already one attack away from death if the enemy burst is predictable.
Deterrence is also useful for buying time until Disengage, Master's Call, a trap or help from your partner becomes available.
Because Readiness can reset Deterrence, Marksmanship can sometimes survive two dangerous windows in quick succession.
Readiness
Readiness resets most Hunter ability cooldowns and is one of the strongest tools in the specialization.
It can be used offensively to create another Chimera Shot, Aimed Shot, Silencing Shot or control sequence.
It can also be used defensively to recover abilities such as Disengage and Deterrence.
Do not automatically use Readiness as soon as the first set of abilities is spent.
Its value depends on what the match needs.
An offensive Readiness can create the second burst required to secure a kill.
A defensive Readiness can save the Hunter from an enemy team's next major push.
Track both teams' cooldowns before deciding which use has greater value.
Feign Death
Feign Death has several important PvP uses.
It immediately drops enemy targeting and can interrupt a cast directed at the Hunter when timed before the spell finishes.
This makes it useful against Polymorph, Fear, damaging casts and other targeted abilities.
Glyph of Feign Death reduces its cooldown by five seconds, allowing frequent use.
Feign Death can also help leave combat in situations where trap placement or repositioning requires it.
Use it deliberately rather than treating it only as a threat-management ability.
Aspect management
Aspect of the Dragonhawk is the normal offensive aspect.
It provides ranged Attack Power and Dodge.
Aspect of the Viper restores Mana but significantly reduces damage while active.
Switch into Viper only when Mana recovery is actually required and return to Dragonhawk once enough Mana has been restored.
Avoid staying in Aspect of the Viper during an important burst window.
Aspect of the Cheetah can help reposition but is dangerous while enemies can hit you because taking damage can daze you.
Use it only when the situation is controlled.
Mana management
Hunter PvP can become Mana-intensive during long arena matches.
Viper Sting and Chimera Shot can create Mana advantages against enemy casters while also helping your own resource management.
Aspect of the Viper provides reliable recovery when necessary.
Avoid wasting Mana on low-value abilities when the match is likely to last a long time.
At the same time, do not conserve Mana so aggressively that a genuine kill opportunity is lost.
Mana matters most when both teams survive the initial exchanges and the game becomes a battle of resources.
Pet choice
Crab, Spider and Ravager are all useful PvP pets.
Crab provides Pin, giving the Hunter an additional immobilize that can help create distance or set up crowd control.
Spider provides Web, another strong ranged immobilize useful for kiting and trap setups.
Ravager provides an additional control ability while offering stronger offensive pressure.
Choose the pet according to the matchup and the type of control your team needs.
Regardless of family, the pet is also important because it enables Master's Call and other PvP utility.
Keep it alive and positioned intelligently.
Pet control
Manual pet control is essential in PvP.
Do not leave the pet permanently attacking whatever target you happen to select.
Pull it back before Scatter Shot and trap setups if its attacks could break crowd control.
Move it around pillars when preparing Master's Call.
Send it toward enemy healers when pet pressure or control is needed.
Keep Mend Pet available during longer games because losing the pet also removes important utility.
Revive Pet is difficult to cast under pressure, so protecting the pet before it dies is much easier than recovering afterward.
Kiting melee opponents
Against melee, distance is one of the Hunter's main defensive resources.
Use Concussive Shot, Frost Trap, pet roots, Disengage and Master's Call together rather than spending every escape at once.
Force the opponent to use their gap closers first whenever possible.
Then create distance again with the next tool.
Scatter Shot can interrupt an offensive sequence and give enough time to move away.
Deterrence should usually be reserved for periods where normal kiting tools are not enough or when the opponent commits major offensive cooldowns.
The goal is not simply to run away indefinitely. Create enough distance to resume Chimera Shot, Aimed Shot and other ranged pressure.
Playing against casters and healers
Against casters, use line of sight together with Silencing Shot and Feign Death.
Do not stand in the open trading damage when a pillar can deny important enemy casts.
Against healers, decide whether the current win condition is burst or Mana pressure.
Use Serpent Sting for maximum immediate damage.
Use Viper Sting when draining Mana is more valuable.
Coordinate Scatter Shot, Freezing Trap and Silencing Shot so the healer cannot immediately recover during your team's burst.
Saving control for a coordinated offensive window is usually stronger than using every crowd control ability independently.
Glyph of Kill Shot
Glyph of Kill Shot reduces the cooldown of Kill Shot by six seconds.
This creates strong execute pressure against targets that survive the first Kill Shot.
Stay ready to fire the second shot as soon as it becomes available if the enemy remains below the health threshold.
Glyph of Disengage
Glyph of Disengage reduces the cooldown of Disengage by five seconds.
The shorter cooldown improves both survivability and offensive positioning.
Frequent Disengage usage is especially valuable against melee-heavy teams where maintaining range determines whether the Hunter can continue dealing damage.
Glyph of Aimed Shot
Glyph of Aimed Shot reduces Aimed Shot's cooldown by two seconds.
This increases the frequency of one of Marksmanship's main instant attacks and makes it easier to maintain the healing-reduction effect on the kill target.
The shorter cooldown also improves repeated burst windows when combined with Chimera Shot.
Consumables and professions
Engineering is particularly strong for PvP because Nitro Boosts provide additional mobility and engineering glove effects add another controllable offensive tool.
Jewelcrafting provides flexible high-value stat gems and is another strong profession choice.
Flask of Endless Rage increases Attack Power when flasks are available.
Blackened Dragonfin provides Agility, while Fish Feast is a general alternative.
Free Action Potion can provide temporary protection from movement-impairing effects where PvP rules and server settings allow its use.